Меню:
This text was written for our internal seminar for developers. After talk I realized, that it could be useful for other developers, and got permission from my company to publish this text on my site. Some text in the first part is borrowed from external sources, such as Wikipedia, C2 Wiki, etc. — I tried to provide links to corresponding pages.
You can find source code for examples from this article at github.
I also have an idea to extend this article to cover Google C++ Testing framework, other mocking frameworks, and Quickcheck++, but this will take some time.
Basics of test-driven development
Test-driven development
Test-driven development (TDD) is a software development process that relies on the repetition of a very short development cycle:
- first the developer writes a failing test case that defines a desired improvement or new function;
- then produces code to pass the test;
- and finally refactors the new code to acceptable standards.
Test-driven development is related to the test-first programming concepts of extreme programming, and often linked to an agile programming approach. In its pure form, TDD has benefits, but it also has drawbacks. But we can use some practices to improve quality of code in our projects.
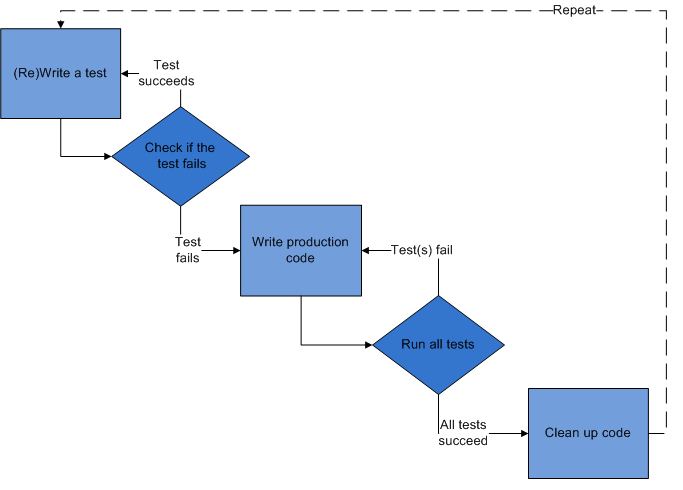
TDD workflow could be described as repetition of following steps (shown on picture):
- define which feature should be implemented;
- add a test(s) for defined use cases;
- compile, run tests and check do we have any error;
- write the code, make test work;
- refactor code;
- repeat tests, fix the code if there are failing tests;
- commit changes;
- switch to the next feature (repeat the whole process starting from the first step).
Unit testing and frameworks
As you know, software testing includes many different forms of tests:
- unit tests;
- integration tests;
- regression tests;
- acceptance tests;
- performance tests.
In this article we'll talk mostly about unit testing, although some of these techniques could be also used for other test types.
Unit testing is a method by which individual units of source code are tested to determine if they are correctly working. A unit is the smallest testable part of an application. In procedural programming a unit may be an individual function or procedure. Unit tests are usually created by developers. The goal of unit testing is to isolate each part of the program, and show that the individual parts are correctly working. A unit test is a strict, written contract that the piece of code must satisfy.
Use of unit tests has several benefits:
- facilitate changes — unit tests allow programmers to refactor code at a later date, and be sure that code still works correctly;
- simplify integration — unit testing may reduce uncertainty in the units themselves and can be used in a bottom-up testing style approach. By testing the parts of a program first, and then testing the sum of its parts, integration testing becomes much easier;
- unit testing provides a sort of living documentation for the system. Developers can look at the unit test's code to gain a basic understanding of the implemented API.
Unit testing frameworks
To simplify development of unit tests, unit test frameworks are usually used. Unit testing framework should provide following functionality:
- Writing unit tests should be simple and obvious for new users.
- Framework should allow advanced users to perform non-trivial tests.
- Test module should be able to have many small test cases and developer should be able to group them into test suites.
- At the beginning of the development users may want to see verbose and descriptive error message, whereas during the regression testing they may just want only to know if are any failed tests.
- For small test modules execution time should prevail over compilation time: users don't want to wait a minute to compile a test that takes a second to run.
- For long running and complex tests users may want to be able to see the test's progress.
- Execution of individual tests should be independent of other tests. For example, termination (crashing) of one test shouldn't lead to skipping of all other tests.
- Simple tests shouldn't require an external library.
Almost any programming language now has several unit testing frameworks. The most widely spread are frameworks from so called xUnit family of frameworks (JUnit, CppUnit, NUnit, etc.). Frameworks from this family are very simple in use, and share common features & architecture. Each of such frameworks consists from:
- Assertions, that check individual conditions;
- Test cases, that combine several assertions, based on some common functionality;
- Test suites, that combine several tests, logically related to each other;
- Fixtures, that provide setup of data or state, needed for execution of some tests, and cleanup of state and/or data after the test is finished. (Some frameworks provide separate per-test case, per-test suite, and/or global fixtures)
- Frameworks also include execution monitor, that controls how tests are executed, and collects data about failed tests.
How to organize tests
Usually unit tests should be created for all publicly exposed functions — free functions
not declared as static, and all public functions of classes, including public constructors
and operators. Unit tests should cover all main paths through functions, including
different branches of conditionals, loops, etc. Your unit test should handle both
trivial, and edge cases, providing wrong and/or random data, so you will be able to test
error handling. You can find more advices on unit tests code organization
in following article.
Test cases are often combined into test suites by some criteria — common functionality, different use cases for same functions, common fixtures, etc. Fixtures are used to perform setup and cleanup of data that are needed to perform test cases — this also allows unit tests to be very short and easy to understand.
There are some recommended ways to implement tests:
- your test case should test only one thing;
- test case should be short;
- test should run fast, so it will possible to run it very often;
- each test should work independent of other tests. Broken test shouldn't prevent other tests from execution;
- tests shouldn't be dependent on the order of their execution.
Some people argues, that combining of all test cases into big functions, improves readability of code, and make it more concise. But there are arguments against this approach (some of them are mentioned in following document):
- if fatal error happens, or an exception is thrown by some check, then the rest of tests will be skipped and there is no way to prevent this;
- there is no way to perform only checks for a particular subsystem of the tested unit.
Testability of code also depends on its design. Sometimes it's very hard to write unit tests, because functionality to be tested is hidden behind many interfaces, or there are many dependencies, so it's hard to set up the test correctly. There are some suggestions on how code should be written to allow easier writing of unit tests for it:
- code should be loosely coupled — class or function should have as few dependencies as possible;
- avoid creation of particular instances of complex classes inside your class. It's better to pass pointers/references to these classes to your class/function — this will allow to use mocking to test your code;
- you should try to minimize public API that is provided by class — it's better to write several classes, that perform separate tasks, instead of creating one class, that does everything.
More advice on writing testable code you can find in following blog post.
Mocking
In a unit test, mock objects can simulate behavior of complex, real (non-mock) objects and they are very useful when a real object is impractical or impossible to incorporate into a unit test. If an object has any of the following characteristics, it may be useful to use a mock object instead:
- supplies non-deterministic results (e.g., current time or current temperature);
- has states that are difficult to create or reproduce (e.g. a network error);
- slow (e.g. a complete database, which would have to be initialized before the test);
- does not exist yet, or may change behavior;
- would have to include information and methods exclusively for testing purposes (and not for its actual task).
Mock objects have the same interface as real objects they mimic, allowing a client object to remain unaware of whether it's using a real object, or a mock object. Many available mock object frameworks allow the programmer to specify which, and in what order, methods will be invoked on a mock object, and what parameters will be passed to them, as well as what values that will be returned. Thus, the behavior of a complex object, such as a network socket, can be emulated by a mock object, allowing the programmer to discover whether the object being tested responds appropriately to the wide variety of states, such objects may be in.
Typical workflow looks following way:
- you should have an interface for class that you will test, so you can have mocked class and real-world class;
- you create a mocked class using some framework (you can also write it yourself, but it's bad idea);
- you have a code, that you want to test against mocked object;
- you create a test case that will use your mocked object instead of real-world one.
Inside this test case you do following:
- you create an instance of mocked class;
- you setup behavior and expectations on mocked object — which methods should be called (or not called), which data will be returned for a particular call, etc.
- you run your code that will use mocked object some way;
- after execution of your code, you evaluate results of execution and check expectations against actual results — usually this is done automatically by framework, when a mocked object is destroyed.
Below you can see example of using Google C++ Mocking framework
Testing in C++
This section covers unit testing and mocking in C++.
Unit testing in C++ & Boost.Test
There are many unit testing frameworks for C++. Currently most popular are Boost.Test, and Google C++ Testing Framework. Both have similar features, but I'll cover Boost.Test because I'm using it in work and personal projects.
Boost.Test has following features:
- It suitable for novice and advanced users
- It allows organization of test cases into test suites
- Test cases could be registered automatically and/or manually
- Parametrized & typed tests to test different data types
- Fixtures (initialization and cleanup of resources): per test-case, per test-suite, global
- Big number of assertions/checkers:
- Exceptions: Throws/Not throws
- Equal, not equal, greater, less, etc
- Equality checking for collections & bits
- Explicit fail/success
- Floating point numbers comparison, including control of closeness of numbers
- Different levels of checking: warning, check, require
- Execution monitor with many options that control test's execution
- User-defined or manually written
mainprocedure - Declaration of which tests should fail
- Output of results in different formats: text, xml, ...
- Progress visualization
- Cross-platform (works on all platforms, supported by Boost)
- licensed under Boost License, that allows to use it anywhere without restriction
- Has very good documentation, including tutorials
The only drawback is that it lacks of mocking features, although Google Mocking framework could be used together with it.
Boost.Test could be used differently, depending on complexity of tests. User can either write test functions themself, and register them manually, forming a hierarchy of tests, or it can use special macros that will register tests automatically.
In this text we'll use "automatic" tests as examples, and you can read about manual test registration in Boost.Test documentation.
Usually, code written for Boost.Test, consists from several objects:
- test cases, that contains assertions
- test suites, that combines several test cases into bigger object
- fixtures, that are used to perform setup and cleanup of resources/data for test cases, test suites and/or global context.
Tests are executed by Execution monitor that controls execution of tests, handles errors, and collects data about executed/failed tests. Developer may control behaviour of execution monitor through command-line options, environment variables, or from source code.
Tests with automatic registration
For simple tests the use of Boost.Test is straightforward — you include necessary header
files, and write test cases (possibly, organizing them into test suites), compile your
test, and link it with the boost_unit_test_framework library (it contains the main
function that will perform setup of tests, and their execution).
Minimal test program
Here is minimal example, that defines one test:
#define BOOST_TEST_MODULE Simple testcases
#include <boost/test/unit_test.hpp>

BOOST_AUTO_TEST_CASE(simple_test) {
  BOOST_CHECK_EQUAL(2+2, 4);
}
First line declares name of this test, second line includes necessary header file, and
lines 4-6 define test — the BOOST_AUTO_TEST_CASE macro is used to define test with given
name (simple_test), and test's body contains one assertion: 2+2 == 4 — this
assertion uses BOOST_CHECK_EQUAL macro to perform check.
After compilation you can run this program, and it will print following on the screen (Boost.Test can also output results in different formats, and you can also control verbosity of output with execution monitor's options — see below):
  Running 1 test case...

  *** No errors detected
If something will go wrong, then framework will print another message on the screen:
  Running 1 test case...
  test-simple.cpp(5): error in "simple_test": check 2+2 == 5 failed [4 != 5]

  *** 1 failure detected in test suite "Simple testcases"
This information includes number of failures in given test program (called Simple
testcases), and shows where error occurred (line 5 in file test-simple.cpp), together with
additional information on error (this depends on what checker was used).
Use of test suites
If you have many test cases in one program, then their maintenance could be hard. Boost.Test, like other frameworks, allows to group several test cases into test suite — this allows to work with them in easier way + adds some other benefits — you can define common fixtures for all test cases, and for example, select which tests should be executed, using command-line options.
Use of test suites is very easy — you need to put the BOOST_AUTO_TEST_SUITE macro (with
name of suite as an argument) before first test case, that should be included into this
test suite, and the BOOST_AUTO_TEST_SUITE_END macro after last test case, that should be
included in this test suite:
#define BOOST_TEST_MODULE Simple testcases 2
#include <boost/test/unit_test.hpp>

BOOST_AUTO_TEST_SUITE(suite1)

BOOST_AUTO_TEST_CASE(test1) {
    BOOST_CHECK_EQUAL(2+2, 4);
}

BOOST_AUTO_TEST_CASE(test2) {
    BOOST_CHECK_EQUAL(2*2, 4);
}

BOOST_AUTO_TEST_SUITE_END()
That's all — compile and run this program as before.
Testing tools/Checkers
Boost.Test provides many different testing tools ("Checkers"). For almost all of them,
there are several checking levels (I will use <level> placeholder instead of actual
values):
WARN- produces warning message if check failed, but errors counter isn't increased and test case continues;
CHECK- reports error and increases errors counter when check is failed, but test case continues;
REQUIRE- similar to
CHECK, but it's used for reporting of "fatal" errors. Execution of test case is aborted. This check should be used for things, like checking is object, that will be used later in the code, was created.
In basic form, the checker is a macro in form BOOST_<level>[_check] that receives one or
more arguments. The only exceptions from this rule are BOOST_ERROR and BOOST_FAIL macros,
that are used to produce explicit errors (normal and fatal). Complete list of checkers you
can find in reference.
Basic macros (BOOST_WARN, BOOST_CHECK, and BOOST_REQUIRE) accept only one argument —
expression to check, like following:
 BOOST_WARN( sizeof(int) == sizeof(short) );
 BOOST_CHECK( i == 1 );
 BOOST_REQUIRE( i > 5 );
If check will fail, then Boost.Test will report line in source code where this
happened, and what condition was specified. You can also provide your own message to
output using BOOST_<level>_MESSAGE macros.
But when you compare something, then it's better to use specialized macros, like
BOOST_<level>_EQUAL, BOOST_<level>_NE, BOOST_<level>_GT, etc. The main advantage of these
macros, is that they will show you both expected, and actual value, instead of simple
message that comparison was failed (this functionality could be also used for your own
predicates, if you'll use BOOST_<level>_PREDICATE macros). For example, look onto
following code:
 int i = 2;
 int j = 1;

 BOOST_CHECK( i == j );
 BOOST_CHECK_EQUAL( i, j );
the first checker will only report that check was failed:
test.cpp(4): error in "test": check i == j failed
while the second checker, will report about problem, together with actual values, used in comparison:
test.cpp(5): error in "test": check i == j failed [2 != 1]
Boost.Test also provides specialized checkers for comparison of collections
(BOOST_<level>_EQUAL_COLLECTION), and bitwise comparison (BOOST_<level>_BITWISE_EQUAL).
Comparison of floating-point numbers with standard comparison operators isn't a good idea
(because of precision), but Boost.Test provides several macros that solve this task (you
need to include additional header file to use them:
boost/test/floating_point_comparison.hpp): BOOST_<level>_CLOSE,
BOOST_<level>_CLOSE_FRACTION, and BOOST_<level>_SMALL.
In some situations, you need to check whenever your code throws an exception or not. To check
that your code doesn't throw exception, you can use BOOST_<level>_NO_THROW macro, that
receives expression, that will be evaluated, and if exception is thrown, it will perform
corresponding action, depending on level. To check, that your code throws given
exception, you can use the BOOST_<level>_THROW macro, that will evaluate expression (first
argument), and check, does it throws exception, and does it have correct type (exception's
type is passed as second argument). The third macros is BOOST_<level>_EXCEPTION that
allows to check, does your code throws exception, but also allows to provide additional
checker, that will check data inside exception object, and return true or false.
Another task, automated by Boost.Test is testing of output results. This functionality
could be used to check functionality of << operator, or similar things. Boost.Test
provides special output class, compatible to std::ostream, and you can output data to it,
and explicitly get access to its content. You can also create a file with "desired
output", and use data from this file to compare against output produced by your code.
In some cases, it could be also useful to get checkpoints, where test case was in normal state. Boost.Test provides 2 macros for this task:
- the
BOOST_TEST_CHECKPOINTmacro is used to create named checkpoint with message, that will output if error will happen — this is very useful when you're checking expressions in loops; - the
BOOST_TEST_PASSPOINTmacro (without arguments) is used to create unnamed checkpoint, and if error will happen, then line, where last checkpoint was set, will printed.
Fixtures
Fixtures — special objects that are used to implement setup and cleanup of data/resources required for execution of unit tests. Separation of code between fixtures and actual test code, allows to simplify unit test's code, and use the same initialization code for different test cases and test suites.
Fixtures in Boost.Test are usually implemented as classes/structs where constructor performs initialization of data, while destructor performs cleanup. For example:
struct MyFixture {
     MyFixture() { i = new int;*i = 0; }
     ~ MyFixture() { delete i; }
    int* i;
};
and you can use it following way:
BOOST_AUTO_TEST_CASE( test_case1 )
{
    MyFixture f;
    // do something with f.i
}
But Boost.Test also provides special macros that allows simplify use of fixtures. For
test cases you can use the BOOST_FIXTURE_TEST_CASE macro instead of BOOST_AUTO_TEST_CASE
— the only difference between them is that former has second argument (fixture name),
that will be created automatically and passed to the test case. There is also additional
advantage over direct use of fixtures in your code — you have direct access to public and
protected members of fixture, for example:
#define BOOST_TEST_MODULE Test-case fixture example
#include <boost/test/unit_test.hpp>

struct F {
    F() : i(1) {}
    ~F() { }
    int i;
};

BOOST_FIXTURE_TEST_CASE(simple_test, F) {
    BOOST_CHECK_EQUAL(i, 1);
}
In this case, the F fixture was created, it holds one variable —
i, and it directly
accessible in our test case.
The similar functionality also provided for test suites — you just need to use the
BOOST_FIXTURE_TEST_SUITE macro instead of BOOST_AUTO_TEST_SUITE. This macro accepts
fixture name as second parameter, and separate fixture object is created for every test in
given test suite. You should remember, that for each test case/test suite, the new
fixture object is created, so changes in fixture from one test case won't available to
other tests (this is really a bad idea).
There is also 3rd type of fixtures, supported by Boost.Test — global fixtures, that could
be used to perform global setup/cleanup tasks. To use some fixture in global context you
need to use the BOOST_GLOBAL_FIXTURE macro, passing fixture name to it as argument — this
will lead to creation of fixture before first test, and destruction of it after the last
test.
Output of results
Usually Boost.Test prints only messages about errors and exceptions, but you can control what will be printed by using different options, described below. There are also compile time options, that allows to control output, for example, threshold level, etc. Usually Boost.Test prints results in human-readable format, but it can also output data in XML, so you can feed them into a database, or dashboard.
There is also a macro that provides explicit printing of data. The BOOST_TEST_MESSAGE
macro receives one argument — message to print, that will be printed together with other
messages.
Execution control
Tests are executed by execution monitor, that takes list of registered tests, execute them (creating fixtures, if necessary), and count the number of failures. By default execution monitor handles all exceptions, including system problems, like wrong memory access. But this behaviour isn't required all the time — sometime you need to get core from the crashed process, or run only some tests, etc.
Commenting out not necessary tests, or do something similar, isn't a good idea — that's why Boost.Test provides many run-time options that control behaviour of execution monitor (some of these options also have compile-time equivalents).
There are two ways to specify run-time configuration option — from command line or by setting an environment variable.
When test program is initializing, execution monitor analyzes command-line options, and
excludes from them all options, belonging to its own configuration. Command-line options
are specified in form --<option name>=<option value> (it shouldn't be space
characters between option's name and its value). Option's names (both, command-line and
environment variables) are case-sensitive.
Here is list of most important options, that are recognized by test programs, that are using standard execution monitor (in parentheses are names of corresponding environment variables):
--auto_start_dbg(BOOST_TEST_AUTO_START_DBG)- (
yesorno, defaultno) specifies, should Boost.Test to try to run debugger, if fatal system error occurs; --catch_system_errors(BOOST_TEST_CATCH_SYSTEM_ERRORS)- (
yesorno, defaultyes) specifies, should Boost.Test to catch system errors, or not; --log_level(BOOST_TEST_LOG_LEVEL)- (
all,success,test_suite,message,warning,error,cpp_exception,system_error,fatal_error, ornothing, default iserror) allows to specify which messages will be printed by test program. You can use this to see which the test is currently executing, together with related information. --random(BOOST_TEST_RANDOM)- allows to run tests in random order (use
0to disable this — default value). If value is greater than 1, then it's used as random seed, if it is equal to 1, then system time is used as random seed; --run_test(BOOST_TEST_RUN_TEST)- allows to specify names of tests to be executed. Users can list test names, or use masks. See documentation on more details and examples;
--show_progress(BOOST_TEST_SHOW_PROGRESS)- (
yesorno, defaultno) specifies, should Boost.Test display progress indicator during execution of test cases, or not.
Description of other options you can find in documentation — they can control format of output, which additional details will be shown, etc.
Mocking frameworks for C++
There are different mocking frameworks for C++ — Google C++ mocking framework, HippoMocks, AMOP, Turtle, etc. Google mocking framework is currently most advanced and actively supported, so we'll use it in our example — other frameworks provide similar functionality.
Google mocking framework has pretty good documentation, that is available as wiki. You can find tutorial in following document, and find more in cookbook, cheatsheet, and FAQ. In this section we'll concentrate on high-level overview of framework and will provide a small example of its use. I assume, that google mock library is already installed on machine.
Google mock follows standard workflow of mocking:
- create a mock object for given class — there are many macros to declare mocked functions. There is also a tool, that can generate mock definition from your source code;
- you create test case that will use your mock class, and inside it you do following:
- create mock object and set expectations on it. There are many different macros and functions, so you can setup almost arbitrary scenario;
- call function(s) that you want to test, and pass mock object to them as an argument (or you can create some object, and set mock object as its member, that will be used by its functions);
- on destruction of mock object, Google mock library checks expectations against actual results, and if they weren't met, then it will report error by throwing an exception, and printing which expectation(s) were failed.
So, let's look at a practical example. To use mock test, we need to include corresponding
header file —
gmock/gmock.h:
#include <gmock/gmock.h>
#include <string>

#define BOOST_TEST_MODULE Mock example
#include <boost/test/unit_test.hpp>
We need to have a class, that we'll mock. This should be virtual class, so Google mock will able to override methods in it:
class PropHolder {
public:
    PropHolder()  { }
    virtual ~PropHolder() { }

    virtual void SetProperty(const std::string& name, int value) = 0;
    virtual int GetProperty(const std::string& name) = 0;
};
This class will be used by functions in another class, that will store reference to
instance of our base class PropHolder:
class TestClass {
public:
    TestClass(PropHolder& ph) : fPropHolder(ph) { }
    void doCalc() {
        if (fPropHolder.GetProperty(std::string("test")) > 100) {
            fPropHolder.SetProperty("test2", 555);
        } else
            fPropHolder.SetProperty("test2", 785);
    }
private:
    PropHolder& fPropHolder;
};
Now we need to create mocked class, that is inherited from PropHolder, and uses macros to
implement corresponding stubs. Google mock provides different macros —
MOCK_METHODN,
MOCK_CONST_METHODN, where last N should match to the number of arguments of the mocked function.
First argument of these macros is a name of method to mock, and second — function's
signature:
class MockPropHolder : public PropHolder {
public:
    MockPropHolder() { }
    virtual ~MockPropHolder() { }

    MOCK_METHOD2(SetProperty, void(const std::string& name, int value));
    MOCK_METHOD1(GetProperty, int(const std::string& name));
};
Now we can use a mock class in our test. We create an instance of mocked class called
mholder, and will set expectations on it. First expectation is that function GetProperty
will be called once with parameter "test", and mocked object should return 101 for this
call. The second expectation specifies that SetProperty function will be called with two
arguments —
"test2" and 555. After setting expectation, we create an instance of our
TestClass and pass reference to mocked object to it. And last line — call of function
doCalc, that uses functions from PropHolder class:
BOOST_AUTO_TEST_CASE(test_gmock) {
    using ::testing::Return;

    MockPropHolder mholder;
    EXPECT_CALL(mholder, GetProperty(std::string("test"))).Times(1).WillOnce(Return(101));
    EXPECT_CALL(mholder, SetProperty(std::string("test2"),555));

    TestClass t(mholder);
    t.doCalc();
}
Google Mock can be used not only with Google C++ Testing framework, but also with other frameworks, so we need to add code to correctly use it with Boost.Test. We'll use global fixture object to do this:
struct InitGMock {
    InitGMock() {
        ::testing::GTEST_FLAG(throw_on_failure) = true;
        ::testing::InitGoogleMock(&boost::unit_test::framework::master_test_suite().argc,
                                  boost::unit_test::framework::master_test_suite().argv);
    }
    ~InitGMock() { }
};
BOOST_GLOBAL_FIXTURE(InitGMock);
We also need to link additional libraries to have this code built —
gmock and gtest.
After that we can run our test program and get results. If everything will work
correctly, and results will match to our expectations, then we'll see standard success
message:
  Running 1 test case...

  *** No errors detected
But if we'll make an error, and forgot to call t.doCalc(), or calculations will be made
incorrectly, then we'll get something like:
  Running 1 test case...
  test-mock.cpp:62: Failure
  Actual function call count doesn't match this expectation.
         Expected: to be called once
           Actual: never called - unsatisfied and active
  test-mock.cpp:63: Failure
  Actual function call count doesn't match this expectation.
         Expected: to be called once
           Actual: never called - unsatisfied and active
  terminate called after throwing an instance of 'testing::GoogleTestFailureException'
    what():  /home/ott/projects/lang-exp/cpp/testing/test-mock.cpp:63: Failure
  Actual function call count doesn't match this expectation.
         Expected: to be called once
           Actual: never called - unsatisfied and active
  unknown location(0): fatal error in "test_gmock": signal: SIGABRT (application abort requested)
  test-mock.cpp(65): last checkpoint

  *** 1 failure detected in test suite "Mock example"
That's all for the mocking part. More information you can find in documentation for Google mock framework, where you can also find many examples of its usage.
Additional information
There is a lot of additional sources of information — books, study courses, articles, etc. For example:
- Books:
- Kent Beck. Test-driven development: By example;
- David Astels. Test Driven Development: A Practical Guide;
- Robert C. Martin. Clean Code: A Handbook of Agile Software Craftsmanship (this book is mostly for Java developers);
- Michael Feathers. Working Effectively with Legacy Code;
- Martin Fowler, Kent Beck, John Brant, William Opdyke, Don Roberts. Refactoring: Improving the Design of Existing Code;
- Steve Freeman, Nat Pryce. Growing Object-Oriented Software, Guided by Tests;
- Steve McConnell, Code Complete, 2ed — contains many good advices on code design, including chapter on unit testing, together with explanation of other types of testing;
- Paul Hamill. Unit Test Frameworks;
- James Shore. The Art of Agile Development;
- Extreme programming series:
- Kent Beck, Cynthia Andres. Extreme Programming Explained: Embrace Change, 2ed;
- Kent Beck, Martin Fowler. Planning Extreme Programming;
- Ron Jeffries, Ann Anderson, Chet Hendrickson. Extreme Programming Installed;
- Lisa Crispin, Tip House. Testing Extreme Programming;
- Ken Auer, Roy Miller. Extreme Programming Applied: Playing to Win.
- For Java developers:
- Petar Tahchiev, Felipe Leme, Vincent Massol, Gary Gregory. JUnit in Action, 2ed;
- J. B. Rainsberger. JUnit Recipes: Practical Methods for Programmer Testing;
- Kent Beck. JUnit Pocket Guide;
- Lasse Koskela. Test Driven: TDD and Acceptance TDD for Java Developers;
- Online resources:
- Unit testing topic at StackOverflow;
- Google Testing Blog;
- Wiki at c2.com;
- Practical Testing — series of blog posts on testing.
Last change: 25.09.2021 14:33
Copyright © 1997-2011Alex Ott · Design by Andreas Viklund · 